

Pattern for No-Sew Sweatpants Baby Carrier
This is basically a Mei Tai-type carrier or Asian Baby Carrier (ABC). Needed: pair of sweatpants, scissors. No waste, either—it uses the whole pants, so there are no scraps! (Unless they have elasticized ankles, in which case those will be scrapped.)

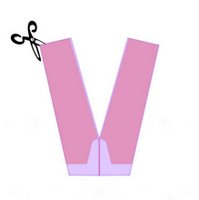
1. Use a pair of heavy fleece sweat pants. (Anything else will probably be too weak and you’ll be wearing your baby down around your knees.) Make sure that the waistband of the pants is big enough to go around your waist. If the pants ankles are elastic, cut them off. Cut the front in the middle from the waist to the crotch.
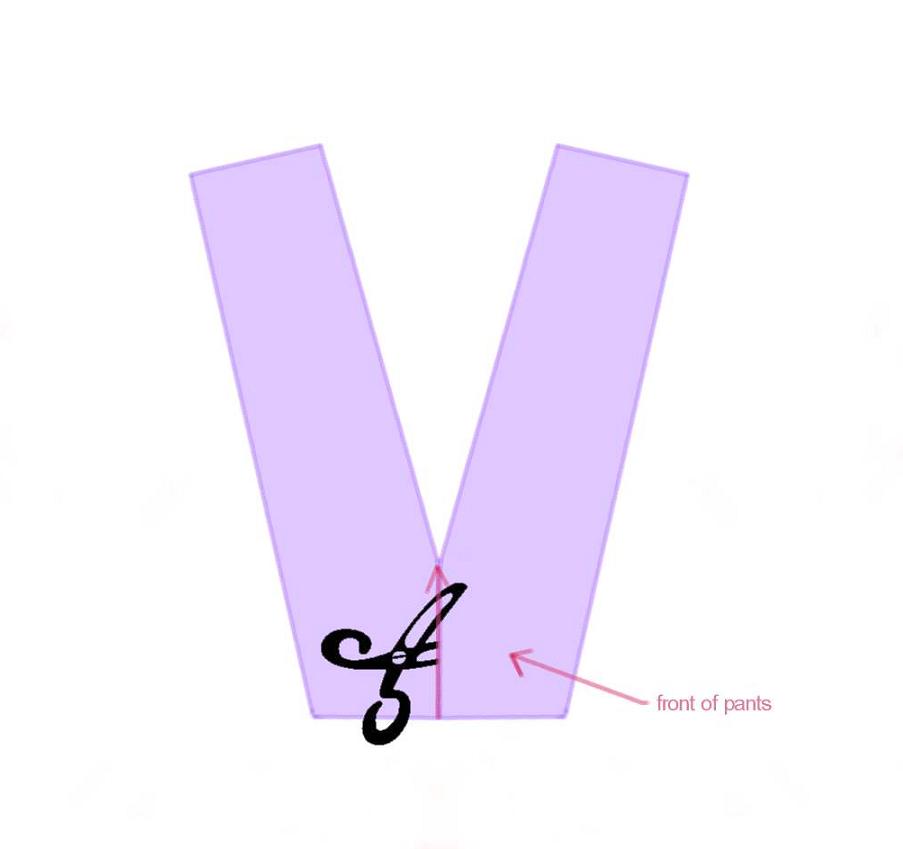
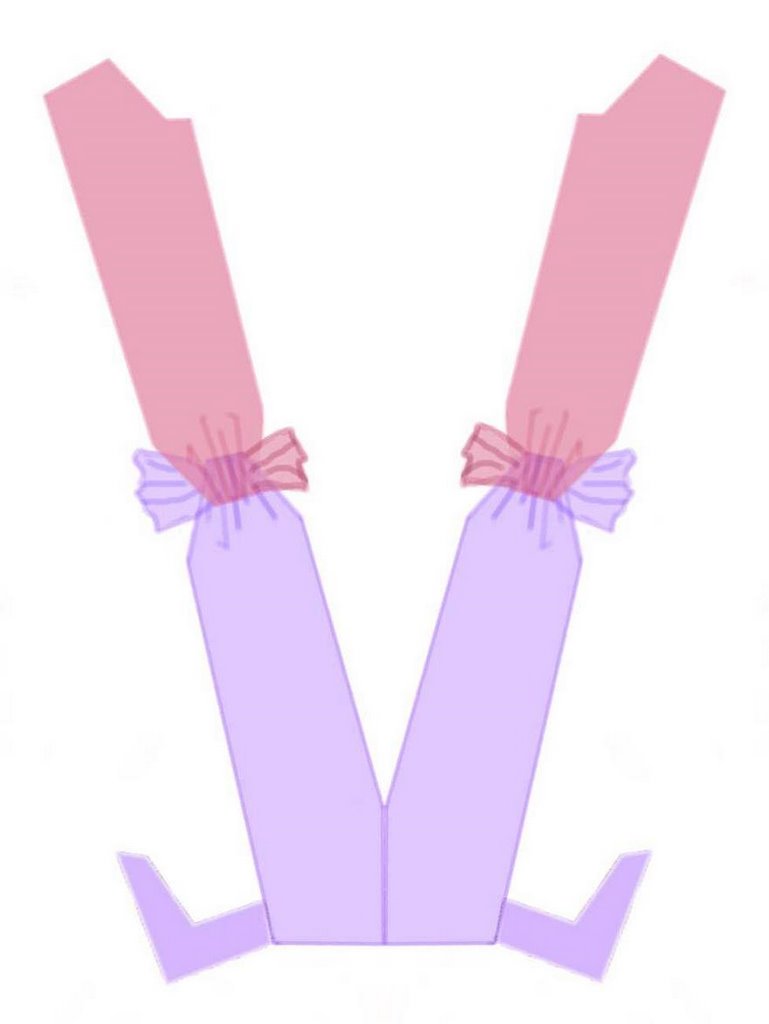
2. Cut off the fronts of the legs as shown. (The pink areas.) Leave the inseam (the seam that goes on the inside of the legs) on the back of the pants (don't cut it off with the pink front part), as that seam will help it not to stretch too much when you’re wearing the baby. Make sure not to cut all the way to the waist of the pants when you’re cutting up the side. Stop about 4” before you get to the waist—you’ll be leaving those angled segments at the waist attached to the pants back.

3. There; that’s all the cutting you’ll be doing! The pieces should look more or less like this when you open the pants. The waistband of the pants is going to be the waistband of your carrier (but the pants will be upside down.)

4. Next, place the cut off pieces at the ends of the legs (leg ends touching). Tie the cut off pieces to the pants legs where the arrows are pointing.

5. That is IT! It should look more or less like this.
To wear your baby in this (inward facing), tie the waistband around your waist (inside of former pants should be inside of the carrier.) The legs go up over your shoulders, cross in back, and then forward around your waist to tie under baby’s bum.
If you want to get fancy, you can sew the ends of the legs together instead of tying them. It adds some useful length to the straps, too. But if you're in a hurry, you can just tie them, hence the no-sew.
My baby turned out to hate having his legs up and sideways in the classic Mei Tai posture. (He was used to a wrap where his legs dangled down more). So I cut small vertical leg slits near the waistband so his legs could hang out. Now he loves it. It's the one I use to nurse him to sleep each night.
This turned out to be my favorite and most comfortable of my carriers, and it only cost me $2 because I found some cheap sweats.
I've since modded this a little by sewing the leg extensions on, but one could do it completely no-sew. Just a pair of scissors and a pair of thick sweatpants as above. In this picture the carrier was completely no-sew (see the knots at my back?) Here you can see his legs hanging down through the slits, but he could have had them around my waist in the classic ABC posture, if he would have tolerated that.
Here you can see how I've replaced the knots in back with seams for a sleeker look. (But they were still hand-sewn quick seams, though double-threaded to take the weight.)
Here I am wearing it on my back, with his legs as they are supposed to be instead of dangling down through slits:
*Update: As of 8/30/09 (possibly before, but I wasn't looking) this page now comes up #1 in Google for the search "no sew mei tai." Cool! I'm famous in an obscure way! ;D
**Update update: have been getting a lot of hits from a forum in which people discuss worries about whether this is strong enough to be a) durable and b) safe.
a) I used this sling every single day (and night!) until my son was 18 months old. And I frequently washed it in the washer, dried it in the dryer. Clearly, it was as durable as--well, a pair of sweatpants.
b) Safety: you have to trust your own judgment when you make or use anything to carry your baby. First, go with that. If you make something and it feels unsafe, then for Pete's sake don't use it. As for this carrier, the baby's weight is held by the legs of the sweatpants (in some ways more like a podeagi than anything else), rather than by the bottom of the carrier around your waist (you could actually untie that once you have the straps tied) so you have to make sure you trust your own knots and/or stitching on the straps/legs to carry the weight of your baby.
1. Use a pair of heavy fleece sweat pants. (Anything else will probably be too weak and you’ll be wearing your baby down around your knees.) Make sure that the waistband of the pants is big enough to go around your waist. If the pants ankles are elastic, cut them off. Cut the front in the middle from the waist to the crotch.

2. Cut off the fronts of the legs as shown. (The pink areas.) Leave the inseam (the seam that goes on the inside of the legs) on the back of the pants (don't cut it off with the pink front part), as that seam will help it not to stretch too much when you’re wearing the baby. Make sure not to cut all the way to the waist of the pants when you’re cutting up the side. Stop about 4” before you get to the waist—you’ll be leaving those angled segments at the waist attached to the pants back.
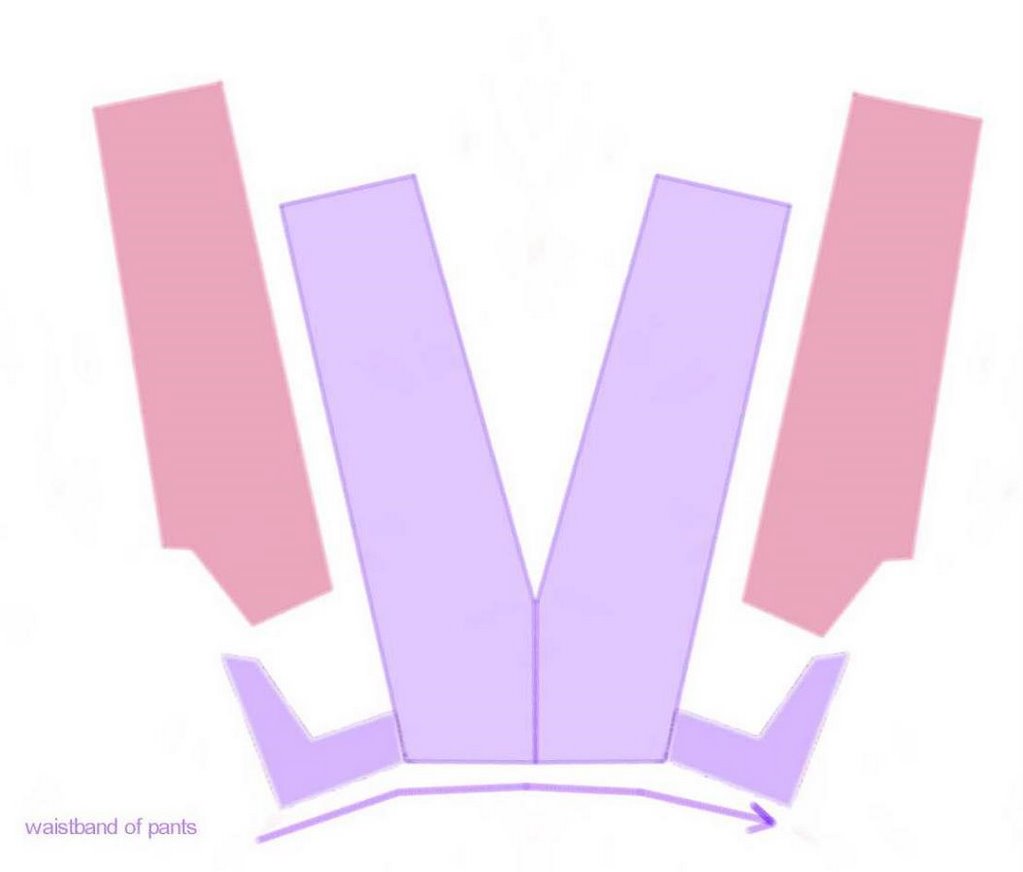
3. There; that’s all the cutting you’ll be doing! The pieces should look more or less like this when you open the pants. The waistband of the pants is going to be the waistband of your carrier (but the pants will be upside down.)
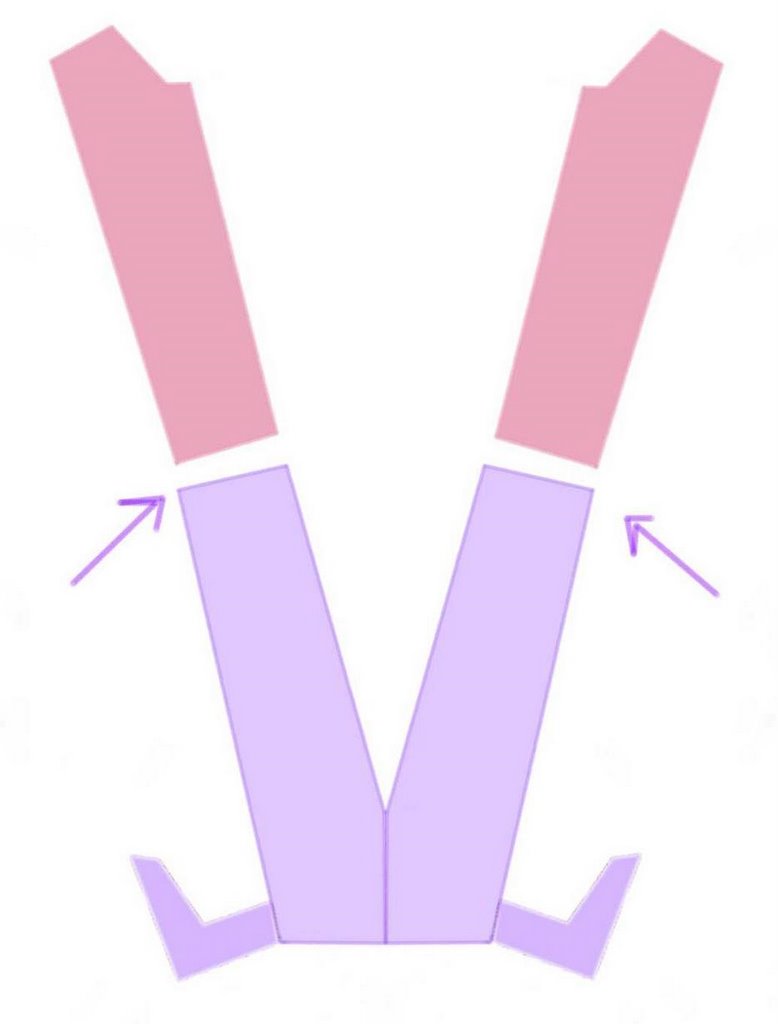
4. Next, place the cut off pieces at the ends of the legs (leg ends touching). Tie the cut off pieces to the pants legs where the arrows are pointing.
5. That is IT! It should look more or less like this.
To wear your baby in this (inward facing), tie the waistband around your waist (inside of former pants should be inside of the carrier.) The legs go up over your shoulders, cross in back, and then forward around your waist to tie under baby’s bum.
If you want to get fancy, you can sew the ends of the legs together instead of tying them. It adds some useful length to the straps, too. But if you're in a hurry, you can just tie them, hence the no-sew.
My baby turned out to hate having his legs up and sideways in the classic Mei Tai posture. (He was used to a wrap where his legs dangled down more). So I cut small vertical leg slits near the waistband so his legs could hang out. Now he loves it. It's the one I use to nurse him to sleep each night.
This turned out to be my favorite and most comfortable of my carriers, and it only cost me $2 because I found some cheap sweats.

I've since modded this a little by sewing the leg extensions on, but one could do it completely no-sew. Just a pair of scissors and a pair of thick sweatpants as above. In this picture the carrier was completely no-sew (see the knots at my back?) Here you can see his legs hanging down through the slits, but he could have had them around my waist in the classic ABC posture, if he would have tolerated that.

Here you can see how I've replaced the knots in back with seams for a sleeker look. (But they were still hand-sewn quick seams, though double-threaded to take the weight.)
Here I am wearing it on my back, with his legs as they are supposed to be instead of dangling down through slits:

*Update: As of 8/30/09 (possibly before, but I wasn't looking) this page now comes up #1 in Google for the search "no sew mei tai." Cool! I'm famous in an obscure way! ;D
**Update update: have been getting a lot of hits from a forum in which people discuss worries about whether this is strong enough to be a) durable and b) safe.
a) I used this sling every single day (and night!) until my son was 18 months old. And I frequently washed it in the washer, dried it in the dryer. Clearly, it was as durable as--well, a pair of sweatpants.
b) Safety: you have to trust your own judgment when you make or use anything to carry your baby. First, go with that. If you make something and it feels unsafe, then for Pete's sake don't use it. As for this carrier, the baby's weight is held by the legs of the sweatpants (in some ways more like a podeagi than anything else), rather than by the bottom of the carrier around your waist (you could actually untie that once you have the straps tied) so you have to make sure you trust your own knots and/or stitching on the straps/legs to carry the weight of your baby.
Labels: babywearing, crafts, pants, pattern, sewing
posted by liz at 8:00 PM
![]()
![]()


19 Comments:
i love it thanks so much
I'm 7 months and all these baby carriers available anywhere from $30-$250 was making me dizzy...After I found your article I got some 6 dollar sweatpants and some nylon thread and twenty minutes later I have a soft, secure, yet cheap mei tai! Thank you for sharing your pattern!
-Jaime
front carry:
http://img.photobucket.com/albums/v739/bat_scratches/Photo-0032.jpg
http://img.photobucket.com/albums/v739/bat_scratches/Photo-0031.jpg
side carry:
http://img.photobucket.com/albums/v739/bat_scratches/Photo-0037.jpg
Thanks for posting your photos! I'm glad it worked out for you.
You'll actually be able to make yourself a sandwich or go to the bathroom!
This was my son's favorite carrier until he was nearly 18 mos, then he got too heavy for it and we went to a more traditionally shaped mei-tai I made with a changing pad as its base.
Wow, what a great tutorial. I love baby carriers and I'm going to add this to my collection.
Thanks!
This is truly a work of genius!
I just made mine and I used an old pair of sweatpants from college. I did it while baby was sleeping and now I can't wait for him to wake up so I can try it out!! Thanks so much for your frugal wisdom.
I'm so happy that people are using this. I created it out of desperation--as one does--because I couldn't afford an expensive baby carrier (or an expensive big sheet of fleece) and I desperately needed to have a hands-free carrier (no nearby family or friends to give me a break). I grew up re-using things so it was an easy step.
I am happy that other mothers can use it too. I would probably love an expensive commercial carrier with all the bells and whistles (so to speak), but on the whole I think the baby-carrier business can be a bit of a racket. Women have been tying babies to themselves inexpensively for millennia.
Go mamas!
thanks for this wonderful idea! I'm wondering of exactly where I should cut leg holes?
It's really not supposed to have leg holes (for a traditional ABC)--the legs are supposed to kind of go around your waist (see the photo of me wearing it on my back).
However, if your baby is as weird as mine and just HAS to hang his/her legs downward, then you might try the slits.
I decided where to put them by putting my baby in the carrier and marking where his hip-joints were, which ended up being about 4" out from the middle seam, and 3" or 4" away from the waistband. I ended up having to mess around with it a little to make them fit his posture.
Just don't make the leg holes tight on the baby's legs--the strap should be supporting the weight anyway.
Just made 2 baby shower gifts. I love this carrier! I think I am going to buy an iron-on heart to put where baby's butt sits, he!he!
This is great! I'm so glad you posted this. I'd previously purchased a ring sling with the assumption that it would be easier to use than it was. It's so great to be able to try out the concept of this carrier so easily without investing too much time/money in making/buying one! I <3 it! :D
You are a life saver! Or should I say wrist, elbow, and back saver.... I have been apprehensive to make the purchase for any of the baby carriers out there on the market with all the mixed reviews! So when I looked into making my own to cut costs incase me or my son hated it, I found your site.... It's perfect! I love it! He loves it! Thank you so much!
Oh, good! Thanks for letting me know. Four years later and I would still use this again if I had another one. (In fact I do use one for guest babies).
Hello! I would like permission to post your picture on a blog for pregnant moms. I love your idea and would like to encourage more creative suggestions from other expectant parents. It's the photo you took in your bathroom mirror that shows it so well. My blog is http://pehpweecare.blogspot.com and I can be reached at weecaremail@utah.gov
Thanks!
Sure; I'm always happy when someone can find a grassroots way to make
things easier for new mothers!
--Liz
No baby here for me (yet?) but I'll totally make this for a friend. Awesome idea.
Super, super, super!! Just wondering what size pants I should use.... my size, or larger?
The waistband of the pants should be able to fit around your waist...and stretch enough to tie a little when cut. (That's not the weight-bearing part anyway.) Mine were more or less my size, maybe a little bit loose.
Awesome! Totally want to try this. I always have a knack for complicating simple ideas... Like sewing a decorative panel onto a NO SEW project!! Haha. I could call it a 'reduced sew' project :-)
Post a Comment
<< Home